Flutter 1. ChangeNotifier
- Flutter 2. ValueNotifier, AnimatedBuilder e o ValueListenableBuilder
- Flutter 1. ChangeNotifier
Índice
Este artigo é baseado no material na série de vídeos ‘Flutter ValueNotifier‘, do canal Fluterrando, onde exploro alguns tópicos sobre reatividade e devo me estendendo em alguns pontos que forem mais de meu interesse. No primeiro momento pretendo explorar a Reatividade com o ChangeNotifier e, na sequência, o ValueNotifier, aplicando a um exemplo com três reatividades de tipos diferentes. Num futuro pretendo integrar estes elementos como atributos de configuração do aplicativo.
O objetivo não é desenvolver um aplicativo específico, mas apenas explorar algumas características do Flutter e alguns de seus pacotes. Neste primeiro momento vou apenas cria o projeto base para o desenvolvimento da série, concluindo com o ChangeNotifier para monitorar as alterações e redesenhar a tela.
Projeto Inicial
Para inciar apenas vá para a sua pasta de trabalhos de sua preferência e crie um novo projeto Flutter de nome new_counter. Em seguida entre na pasta criada e abra o VSCode:
alves@arabel:~$ flutter create settings
alves@arabel:~$ cd settings
alves@arabel:~$ code .
Refatorando o Código
Na sequência irei refatorar o código para deixá-lo mais organizado. No entanto se desejar o código refatorado está disponível no link counter-00.zip, de forma que pode descompactado na parta lib e pular para a seção Reatividade com ChangeNotifier.
Sendo bastante direto vou refatorar o código do contador padrão do Flutter para deixá-lo um pouco mais organizado. Crie uma pasta lib/pages e um arquivo home_page.dart nela. Em seguida transfira a classe MyHomePage para este arquivo:
import 'package:flutter/material.dart';

class HomePage extends StatefulWidget {
  const HomePage({super.key, required this.title});

  final String title;

  @override
  State<HomePage> createState() => _HomePageState();
}

class _HomePageState extends State<HomePage> {
  int _counter = 0;

  void _incrementCounter() {
    setState(() {
      _counter++;
    });
  }

  @override
  Widget build(BuildContext context) {
    return Scaffold(
      appBar: AppBar(
        title: Text(widget.title),
      ),
      body: Center(
        child: Column(
          mainAxisAlignment: MainAxisAlignment.center,
          children: <Widget>[
            const Text(
              'You have pushed the button this many times:',
            ),
            Text(
              '$_counter',
              style: Theme.of(context).textTheme.headlineMedium,
            ),
          ],
        ),
      ),
      floatingActionButton: FloatingActionButton(
        onPressed: _incrementCounter,
        tooltip: 'Increment',
        child: const Icon(Icons.add),
      ),
    );
  }
}
Aproveite e troque todas as ocorrências de MyHomePage para apenas HomePage.
Em seguida crie um arquivo lib/app_counter.dart e transfira para ele a classe MyApp, aqui renomeada para AppCounter:
import 'package:flutter/material.dart';

import 'pages/home_page.dart';

class AppCounter extends StatelessWidget {
  const AppCounter({super.key});

  // This widget is the root of your application.
  @override
  Widget build(BuildContext context) {
    return MaterialApp(
      title: 'Flutter Demo',
      theme: ThemeData(
        primarySwatch: Colors.blue,
      ),
      home: const HomePage(title: 'Flutter Demo Home Page'),
    );
  }
}
Por fim o main.dart ficará assim:
import 'package:flutter/material.dart';

import 'app_counter.dart';

void main() {
  runApp(const AppCounter());
}
O código refatorado fica organizado na pasta lib do projeto na forma:
alves@arabel:lib$ tree
.
├── app_counter.dart
├── main.dart
└── pages
    └── home_page.dart
Ajustes Finais
Para melhor atender os objetivos desta série é conveniente efetuar algumas mudanças no home_page.dart adicionando um variável booleana e uma de três estados, através de um enum. O código final é apresentado a seguir, e as alterações são descritas na sequência.
import 'package:flutter/material.dart';

enum ThreeState { first, second, third }

class HomePage extends StatefulWidget {
  const HomePage({super.key, required this.title});

  final String title;

  @override
  State<HomePage> createState() => _HomePageState();
}

class _HomePageState extends State<HomePage> {
  int _counter = 0;
  bool _selection = true;
  ThreeState _state = ThreeState.first;

  void _incrementCounter() {
    setState(() {
      _counter++;
    });
  }

  void _toggleSelection() {
    setState(() {
      _selection = !_selection;
    });
  }

  void _toggleState() {
    setState(() {
      switch (_state) {
        case ThreeState.first:
          _state = ThreeState.second;
          break;
        case ThreeState.second:
          _state = ThreeState.third;
          break;
        case ThreeState.third:
          _state = ThreeState.first;
          break;
      }
    });
  }

  @override
  Widget build(BuildContext context) {
    return Scaffold(
      appBar: AppBar(
        title: Text(widget.title),
      ),
      body: Center(
        child: Column(
          mainAxisAlignment: MainAxisAlignment.center,
          children: <Widget>[
            Row(
              mainAxisAlignment: MainAxisAlignment.center,
              children: [
                ElevatedButton(
                  onPressed: _incrementCounter,
                  child: const Icon(Icons.add),
                ),
                const SizedBox(width: 30),
                Text(
                  'Counter: $_counter',
                ),
              ],
            ),
            const SizedBox(height: 30),
            Row(
              mainAxisAlignment: MainAxisAlignment.center,
              children: [
                ElevatedButton(
                  onPressed: _toggleSelection,
                  child: const Text('Toggle'),
                ),
                const SizedBox(width: 30),
                Text(
                  'Selection: $_selection',
                  style: Theme.of(context).textTheme.titleMedium,
                ),
              ],
            ),
            const SizedBox(height: 30),
            Row(
              mainAxisAlignment: MainAxisAlignment.center,
              children: [
                ElevatedButton(
                  onPressed: _toggleState,
                  child: const Text('Toggle'),
                ),
                const SizedBox(width: 30),
                Text(
                  'State: ${_state.name}',
                  style: Theme.of(context).textTheme.titleMedium,
                ),
              ],
            ),
          ],
        ),
      ),
    );
  }
}
A primeira mudança foi a adição do ThreeState na linha 3, para declarar um variável de três estados: {first, second, third}. Nas linhas 16 e 17 são adicionadas as declarações das variáveis internas _selection, uma booleana, e _state, uma ThreeState.
Em adição a função interna _incrementCounter, duas novas são adicionadas para alterar os valores das novas variáveis. São elas:
_toggleSelection, linhas 25 à 29: para alternar o estado de_selectionentretrueefalse;_toggleState, linhas 31 à 45: para alternar entre o estado do_stateentre os três estados possíveis deThreeState.
Para apresentar os valores destas variáveis reestruturei a apresentação para que todas ficassem com a mesma estrutura, removendo o widget FloatingActionButton e acrescentando um ElevatedButton e um Text, separados em três Rows para apresentar os resultados.
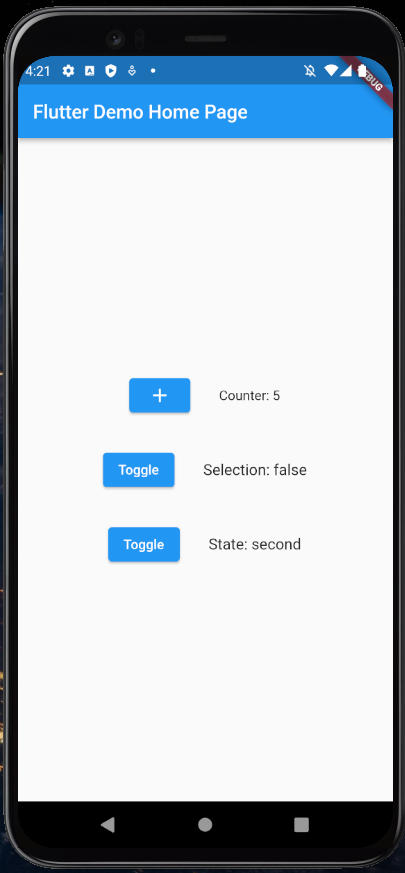
A tela final do aplicativo é apresentado na figura ao lado. Cada botão se encarrega de alterar o estado apresentado ao lado, e estes são atualizado na tela. A tela é redesenhada a cada vez que a execução do código passa por um dos setState, das linhas 20, 26 e 32, acionadas pelos respectivos botões.
Separando o Controller
O próximo passo será criar uma classe para controlar os elementos do aplicativo e assim separar as regras de controle de estado da widget principal. Isto também vai facilitar as integrações que pretendo fazer mais adiante, além desta separação deixar o código mais organizado.
Inicialmente vou criar um arquivo app_settings.dart na pasta lib/settings. Neste arquivo será criado a classe AppSettings com os três atributos _counter, _selection e _state. O conteúdo deste arquivo é apresentado a seguir:
enum ThreeState { first, second, third }

class AppSettings {
  int _counter = 0;
  bool _selection = false;
  ThreeState _state = ThreeState.first;

  int get counter => _counter;

  bool get selection => _selection;

  ThreeState get state => _state;

  void increment() => _counter++;

  void toggleSelection() => _selection = !_selection;

  void toggleState() {
    switch (_state) {
      case ThreeState.first:
        _state = ThreeState.second;
        break;
      case ThreeState.second:
        _state = ThreeState.third;
        break;
      case ThreeState.third:
        _state = ThreeState.first;
        break;
    }
  }
}
Observe que o enum ThreeState é migrado para este arquivo, visto que a ideia é passar todo o controle dos elementos que definem a tela para esta classe, de forma que este será importado pelo home_page.dart. Todos as funções para alteração e acesso às três variáveis de controle foram implementadas na classe:
increment(), linha 14: incrementa o_counter;toggleSelection(), linha 16: altera estado do_selection;toggleState(), linhas 18 à 30: altera estado do_state.
Os respectivos getters também foram criados para recuperar os valores dos atributos internos da classe.
O próximo passo é incorporar a classe AppSettings ao widget HomePage.
Inicialmente substitua a declaração do enum da linha 3, no home_page.dart, pelo import:
import '../settings/app_settings.dart';Na sequência substitua as declarações das linhas 15 à 17 pela declaração de uma variável settings:
final settings = AppSettings();Por fim basta alterar as implementações internas às funções _incrementCounter, _toggleSelection e _toggleState para chamar as funções apropriadas da classe, sem remover os setStates. O resultado final é apresentado a seguir:
import 'package:flutter/material.dart';

import '../settings/app_settings.dart';

class HomePage extends StatefulWidget {
  const HomePage({super.key, required this.title});

  final String title;

  @override
  State<HomePage> createState() => _HomePageState();
}

class _HomePageState extends State<HomePage> {
  final settings = AppSettings();

  void _incrementCounter() {
    setState(() {
      settings.increment();
    });
  }

  void _toggleSelection() {
    setState(() {
      settings.toggleSelection();
    });
  }

  void _toggleState() {
    setState(() {
      settings.toggleState();
    });
  }

  @override
  Widget build(BuildContext context) {
    return Scaffold(
      appBar: AppBar(
        title: Text(widget.title),
      ),
      body: Center(
        child: Column(
          mainAxisAlignment: MainAxisAlignment.center,
          children: <Widget>[
            Row(
              mainAxisAlignment: MainAxisAlignment.center,
              children: [
                ElevatedButton(
                  onPressed: _incrementCounter,
                  child: const Icon(Icons.add),
                ),
                const SizedBox(width: 30),
                Text(
                  'Counter: ${settings.counter}',
                ),
              ],
            ),
            const SizedBox(height: 30),
            Row(
              mainAxisAlignment: MainAxisAlignment.center,
              children: [
                ElevatedButton(
                  onPressed: _toggleSelection,
                  child: const Text('Toggle'),
                ),
                const SizedBox(width: 30),
                Text(
                  'Selection: ${settings.selection}',
                  style: Theme.of(context).textTheme.titleMedium,
                ),
              ],
            ),
            const SizedBox(height: 30),
            Row(
              mainAxisAlignment: MainAxisAlignment.center,
              children: [
                ElevatedButton(
                  onPressed: _toggleState,
                  child: const Text('Toggle'),
                ),
                const SizedBox(width: 30),
                Text(
                  'State: ${settings.state.name}',
                  style: Theme.of(context).textTheme.titleMedium,
                ),
              ],
            ),
          ],
        ),
      ),
    );
  }
}
Ainda terá de trocar as strings das linhas 54, 68 e 83 para chamarem o elemento correto do settings. Essencialmente adicionar um ‘settings.‘ à frente de cada variável.
Neste momento o código deve retornar a funcionar, com os três botões alterando e redesenhando a tela. Caso tenha alguma dificuldade pode baixar os arquivos da pasta lib do link: counter-00.zip.
Reatividade com ChangeNotifier
A ideia agora é ativar a reatividade com o ChangeNotifier, para que sempre que um dos atributos da classe AppSettings for modificada a tela seja redesenhada. Para isto vamos iniciar pelas alterações ao app_settings.dart, alterando a classe AppSettings para que ela gere uma notificação de alteração de seus atributos.
Adicionado o ChangeNotifier ao AppSettings
Primeiro faça com que a classe AppSettings estenda a classe ChangeNotifier, alterando a sua declaração para:
class AppSettings extends ChangeNotifier{
...
Isto vai te obrigar a importar o package:flutter/material.dart, onde o ChangeNotifier é declarado. Para terminar as alterações aqui basta adicionar um notifyListeners() ao final de cada função de alteração dos atributos, para que uma notificação seja criada para quem estiver ouvindo. Ao final o app_settings.dart vai ficar como segue:
import 'package:flutter/material.dart';

enum ThreeState { first, second, third }

class AppSettings extends ChangeNotifier {
  int _counter = 0;
  bool _selection = false;
  ThreeState _state = ThreeState.first;

  int get counter => _counter;

  bool get selection => _selection;

  ThreeState get state => _state;

  void increment() {
    _counter++;
    notifyListeners();
  }

  void toggleSelection() {
    _selection = !_selection;
    notifyListeners();
  }

  void toggleState() {
    switch (_state) {
      case ThreeState.first:
        _state = ThreeState.second;
        break;
      case ThreeState.second:
        _state = ThreeState.third;
        break;
      case ThreeState.third:
        _state = ThreeState.first;
        break;
    }
    notifyListeners();
  }
}
Agora é o momento de modificar o home_page.dart.
Colocar o HomePage em Escuta
No arquivo home_page.dart as linhas 6 à 14, as declarações e as funções _incrementCounter, _toggleSelection e _toggleState, pois elas não serão mais necessárias. Depois adicione a declaração da variável settings e a função initState() à classe _HomePageState com o código a seguir:
...
  final settings = AppSettings();

  @override
  void initState() {
    super.initState();
    settings.addListener(() {
      setState(() {});
    });
  }
...
O método addListener é herdado do ChangeNotifier, e é ele que vai deixar o HomePage na escuta por uma notificação enviada pelos notifyListeners() adicionados na classe AppSettings.
Para terminar, basta substituir as chamadas aos métodos, removidos do _HomePageState, pelos métodos correspondentes do settings: settings.increment, settings.toggleSelection e settings.toggleState, respectivamente.
O código final é apresentado a seguir:
import 'package:flutter/material.dart';

import '../settings/app_settings.dart';

class HomePage extends StatefulWidget {
  const HomePage({super.key, required this.title});

  final String title;

  @override
  State<HomePage> createState() => _HomePageState();
}

class _HomePageState extends State<HomePage> {
  final settings = AppSettings();

  @override
  void initState() {
    super.initState();
    settings.addListener(() {
      setState(() {});
    });
  }

  @override
  Widget build(BuildContext context) {
    return Scaffold(
      appBar: AppBar(
        title: Text(widget.title),
      ),
      body: Center(
        child: Column(
          mainAxisAlignment: MainAxisAlignment.center,
          children: <Widget>[
            Row(
              mainAxisAlignment: MainAxisAlignment.center,
              children: [
                ElevatedButton(
                  onPressed: settings.increment,
                  child: const Icon(Icons.add),
                ),
                const SizedBox(width: 30),
                Text(
                  'Counter: ${settings.counter}',
                ),
              ],
            ),
            const SizedBox(height: 30),
            Row(
              mainAxisAlignment: MainAxisAlignment.center,
              children: [
                ElevatedButton(
                  onPressed: settings.toggleSelection,
                  child: const Text('Toggle'),
                ),
                const SizedBox(width: 30),
                Text(
                  'Selection: ${settings.selection}',
                  style: Theme.of(context).textTheme.titleMedium,
                ),
              ],
            ),
            const SizedBox(height: 30),
            Row(
              mainAxisAlignment: MainAxisAlignment.center,
              children: [
                ElevatedButton(
                  onPressed: settings.toggleState,
                  child: const Text('Toggle'),
                ),
                const SizedBox(width: 30),
                Text(
                  'State: ${settings.state.name}',
                  style: Theme.of(context).textTheme.titleMedium,
                ),
              ],
            ),
          ],
        ),
      ),
    );
  }
}
O código completo está no link counter-01.zip. Por motivo funcionais o nome da pasta base mudou para settings no lugar de counter e pode aparecer trocado em alguns arquivos zip.
Conclusões
Após estas alterações o aplicativo deve retornar a funcionar, agora redesenhando a tela a cada notifyListeners() enviados pelos métodos de alterações dos atributos do settings, gerados ao se pressionar os botões.
No próximo texto vou refazer isto com o ValueNotifier e empregar o AnimatedBuilder e o ValueListenableBuilder, o que permite redesenhar apenas a parte alterada da tela. Isto pode ser bem útil para aplicativos mais elaborados.
Deixe uma resposta