Starting Your Financial Control

Finances is a powerful tool designed to offer you comprehensive and intuitive control over your personal finances. This text will follow the roadmap of our video tutorial (Finances (pt_BR) – YouTube or Finances (en) – YouTube), detailing step by step how you can make the most of the main functionalities of the app. From creating and managing your accounts, adding custom categories and budgets, to posting transactions, our guide is here to ensure that you can navigate the app with ease.
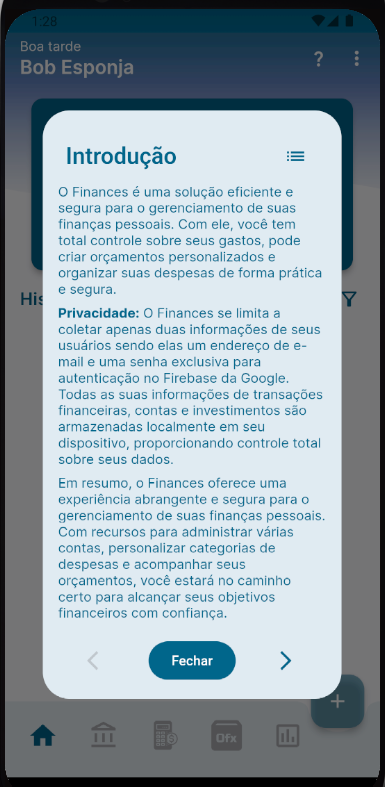
Access to the User Manual
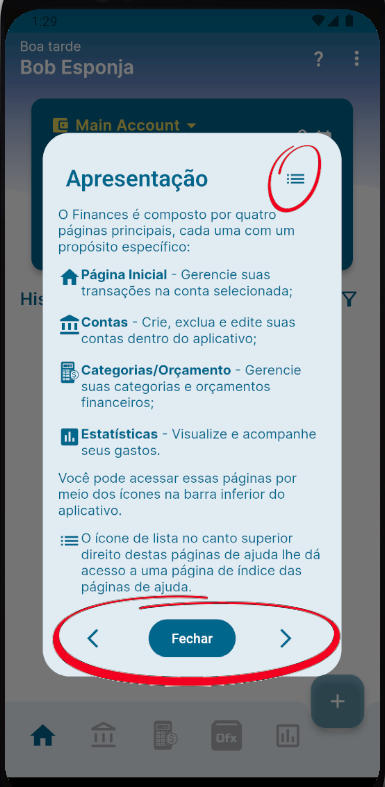
Upon starting Finances, a welcome dialog introduces you to the user manual, available on the home screen. This manual is your go-to resource for deeply understanding how each functionality of the app works. Whether you are a beginner user or someone looking to maximize the use of the app’s advanced tools, the manual offers valuable insights and detailed guidance.

Navigation in the Help Dialog
The help dialog is designed to be as intuitive as the app itself. Use the buttons located at the bottom of the screen to navigate through the manual pages: go back to review information, close the manual when you have finished, or advance to the next section to continue your learning.
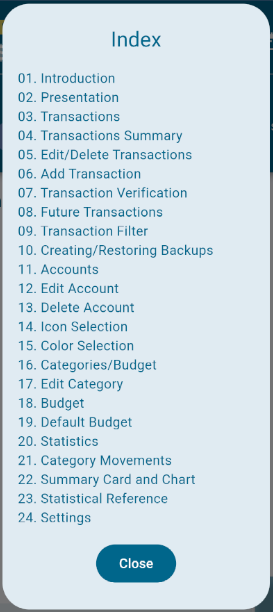
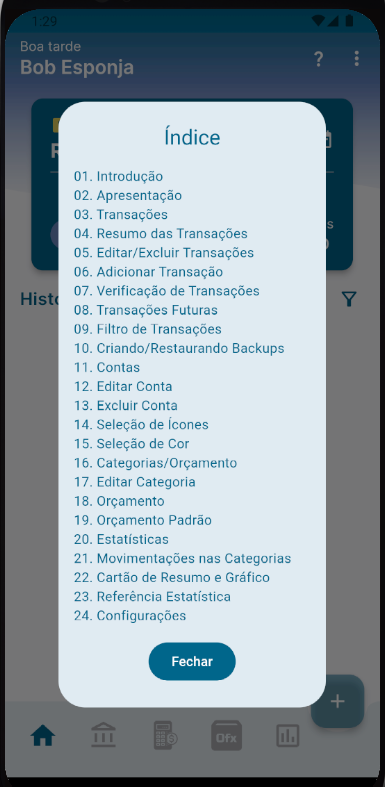
Quick Access to the Index
In the upper right corner of the manual dialog, you will find an index icon. Clicking on it, a list of all the topics covered in the manual is displayed, allowing you to jump directly to the information you need without having to go through all the pages.
Contextual Help
To further facilitate access to relevant information, Finances incorporates question mark (?) icons on various screens. Tapping on this icon will direct you to the appropriate section of the manual, corresponding to the functionality or screen you are exploring at the moment. This contextual help is a quick and convenient way to get assistance without interrupting your workflow.
With these help and support tools at your disposal, Finances ensures that you have all the necessary information to manage your personal finances effectively.
Creating Accounts
The foundation of effective financial management in Finances starts with setting up your accounts. These virtual accounts are essential to mirror and manage your capital in different forms – be they bank accounts, savings, investments, cash in wallet, or credit cards. Here is how you can create and customize your accounts in the app to reflect your financial reality.
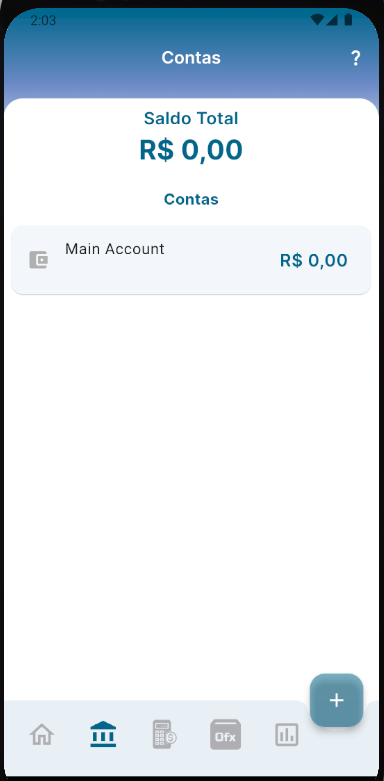
Accessing the Accounts Page
- Home: Navigate to the Accounts page in the app, accessible through the second icon in the app’s bottom navigation bar.
- Default Account: The app starts with a predefined default account. This account cannot be removed but can be customized to suit your needs.
Customizing the Main Account
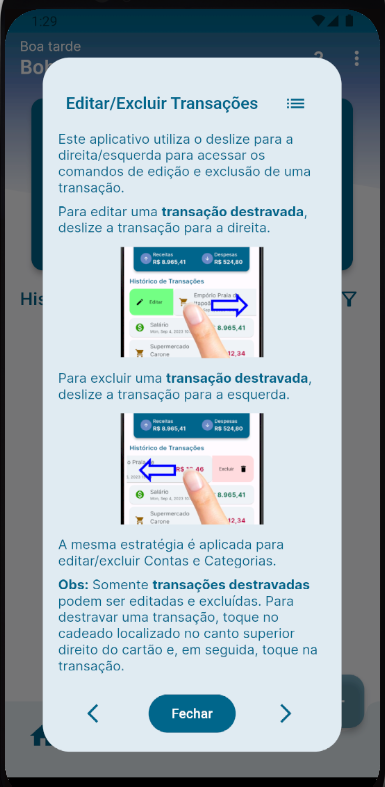
Throughout the app, Finances works with swipe right and swipe left gestures to access the edit or delete commands of an element on the page, respectively. Therefore, to customize the account:

- Name and Description: Swipe the account right to access editing. Here, you can change the account name and add a detailed description that clearly identifies it.
- Icon and Color: Customize the account’s icon and color for easy visual identification. Finances offers three icon families for your choice (MaterialIcons, TrademarkIcon, and FontelloIcons), allowing wide variations for customization. Use the search by the icon’s name in English to find exactly what you’re looking for. The color can be selected from the predefined options, in the colored circles below, or customized to your liking through the color adjustment dialog, accessible by clicking on the selected icon or the paint roller below.
Adding a Credit Card Account
- Account Creation: Add a specific account for your Visa card (or any other). Name it, add relevant details in the description, choose a representative icon, and adjust the color for quick identification.
Establishing a Savings Account
- Setup: To manage your savings, add a savings or investment account. Define a name, briefly describe its purpose, and personalize it with a distinct icon and color, just as you did with the previous accounts.
With these steps, you will successfully set up three fundamental accounts in Finances. This process can be repeated as many times as necessary to add other accounts you use, ensuring complete and integrated financial control. Customizing your accounts in Finances not only helps in organizing your finances but also makes the app experience more enjoyable and tailored to your lifestyle.
Organizing Your Finances with Categories
After setting up your accounts in Finances, the next crucial step is to structure your categories of income and expenses for a detailed classification of your spending. This not only facilitates tracking where your money is going but also enhances the accuracy of your financial planning.
Accessing Categories
- To start, access the Categories page, located in the bottom navigation bar of the app.
- Finances already comes with two predefined categories: one for income (or revenue) and another for transfers.
Customizing the Income Category
- Editing: This category can be customized or deleted as needed. Simply swipe it to access the editing options.
- Customization: Change the category name, set its primary use (such as revenue or debit), and choose an icon and color that best represent the category. The primary use is pre-set for new transactions but can be changed at any time during the insertion or editing of a transaction.
Transfer Category
- Editing: Although the Transfer category can be edited in terms of name, icon, and color, it cannot be deleted.
- Special Function: This category is essential for managing transfers between your accounts, facilitating control of movements such as credit card payments or transfers to other accounts.
Creating New Categories
Next, add new categories to better organize your expenses according to your needs. Here are some suggestions:
- Groceries: For supermarket expenses, including food and household items.
- Bills: Category for utility bills such as water, energy, and gas.
- Pharmacy: Expenses on medicines, vitamins, and other pharmacy products.
- Health: Medical expenses, including health plans and consultations.
- Snacks: Purchases at snack bars, coffee shops, and ice cream parlors.
- Entertainment: Expenses on fun activities, such as concerts, cinema, and games.
- Restaurant: Meals out at restaurants.
- Transport: Expenses on transport, whether public or private, including spending on your own vehicle.
Tip
The careful selection of accounts and categories is fundamental for the effective use of Finances. A good organization of these elements not only simplifies the management of your finances but also provides valuable insights into your spending habits and potential areas for savings. Customize your categories according to your lifestyle and financial needs to maximize the benefits of the app and keep your finances under control.
Recording Transactions
With the initial settings established, the Finances system is ready to record user transactions. The effectiveness of a financial control system lies in the immediate insertion of transactions at the moment they occur. For bulk transaction entry, refer to the subsequent section “Importing Transactions via Ofx Files“.
We will proceed with the explanation starting with the insertion of the initial balance, moving on to the recording of usual expenses, including bills, transfers, among others.
Initial Balance
The first step in managing your finances is to record the initial balance of your accounts. This value represents the starting point for tracking your financial inflows and outflows. To do this, on the transactions page, the first icon at the bottom of the app, press the addition button “+”. This will open a dialog to enter the transaction information.
- Value: Enter the amount that reflects the current balance of your account.
- Description: Add a brief description to identify this entry, such as “Initial Balance”.
- Category: Select the credit category. The app automatically chooses the “Income” option, based on the previous category settings, facilitating the correct classification of the transaction.
- Date and Time: Set when this balance entered your account, selecting its date and time.
Bill Payment
Continuing with the transaction records, the next example involves the payment of a household bill, such as electricity.
- Value: Inform the amount paid on the electricity bill.
- Description: Provide details that help identify the transaction, for example, “Electricity Bill”.
- Category: Choose the appropriate category for bill expenses.
- Date and Time: Select when the payment was made, to keep an accurate temporal record of your outflows.
After adding the transaction:
- Balance Update: The balance of your account will automatically reflect the new transaction, with expenses highlighted in red and incomes in green, providing a clear view of your finances.
- Editing and Removal: The newly inserted transaction will be visible on the main transactions page, available for any adjustments or deletion as necessary. Simply swipe left or right to edit or remove the transaction.
These initial steps of adding the initial balance and recording regular expenses are essential for maintaining accurate control over your personal finances. Finances facilitates this process, allowing you to keep a close eye on your financial movements and plan your budget more effectively.
Scheduling Future Payments
To schedule a future payment, start the process of adding a new transaction. Fill in the details of the transaction, including the amount, description, appropriate category, and select a future date for posting.
After adding the transaction, it will be displayed on the transactions page in light grey tones, highlighting that it is a future payment.
Note: By default, Finances displays future transactions scheduled for the next 7 days, providing a clear view of what is coming in the short term. This viewing window can be adjusted according to your preference.
Recording a Transaction in a Different Account
In the initial interface, the current active account is highlighted at the top, taking “Conta Pessoal Itau” as an example. To record an expense on the “Visa Credit Card” account, it is necessary to select the corresponding account. This is done by pressing the account currently highlighted in yellow at the top of the screen and choosing the appropriate account.
Once the account is selected, proceed with recording the expense, completing all required fields, such as amount, description, and category, following the usual procedure.
After completion, the newly recorded transaction will be displayed on the home screen, reflecting the updated balance of the chosen account appropriately. The balances of all accounts can be checked on the account management page.
An Intelligent Transaction Dialog
The design of the transaction entry interface was conceived to optimize the user experience, simplifying the inclusion of transactions without the need to navigate to change the active account or to add a new category that becomes necessary.
Changing the Account for the Transaction
There is a practical method that allows recording a transaction in a different account than the currently active one, eliminating the need for prior selection. This procedure is particularly beneficial for the agile recording of transactions, especially when managing multiple accounts within the app.
In the transaction dialog, there is an account selector at the top, functioning similarly to the one presented on the main screen of Finances. This selector facilitates changing the destination account for recording the transaction, without the need to return to the home screen.
By choosing a different account through this selector and completing the transaction data, the registration is specifically made in the selected account.
Adding a New Category during the Transaction
If it is necessary to add a category not yet existing in the app, simply press the “+” button, located at the far right of the category selector, to introduce a new category, which will be automatically applied to the ongoing transaction.
Income/Expense Selection in Category
During the creation of a new category, it is possible to define its main application as Income or Expense. This definition is adopted automatically when the category is selected in the Transaction dialog. However, if necessary, this can be modified after selecting the category by adjusting the option at the top of the Transaction dialog.
To view the newly added transaction, it is necessary to switch to the active account on the home screen of the app, corresponding to the account of the transaction made.
Such functionalities enrich the user experience by offering flexibility in managing transactions between different accounts and categories, ensuring that financial control remains organized and adjusted to the user’s needs.
Transfers Between Accounts
Transferring values between your accounts is a common process in financial management, useful both for allocating surplus funds into a savings account and for making credit card bill payments. Here, we refer specifically to transfers between accounts under your management, not to transfers to third parties, which would be recorded as regular payment transactions for services or acquisition of goods.
Making a Transfer
Suppose you want to transfer R$500 to your savings account. The process begins with creating a new transaction, following the usual steps of completion.
- Category: Select “Transfers” as the category. This will display a list of possible destination accounts for the transfer.
- Destination Account Selection: Choose the savings account to which the funds will be transferred, adjust the date and time of the transfer, and confirm the operation.
Viewing and Effect of the Transfer
On the home screen, the transfer is visualized as a debit in the source account and a credit in the destination account, in this case, XP Investimentos.
Paying Your Credit Card Bill
Paying your credit card bill is effectively a transfer of funds between two of your accounts — for example, from a bank account or your wallet to the specific credit card account.
This operation is processed in the app in the same way as any other transfer. Therefore, simply create a transfer of the amount due on the credit card account. This way, the debts on the card are settled, and the card account balance is updated to reflect the payment made.
Recurring Transactions
For regular expenses, such as a fixed-value subscription like video streams, “Finances” allows you to create a transaction and configure it to repeat automatically.
- For this, fill out a transaction as usual and select the “Repeat Monthly” option at the bottom of the transaction.
- Specify the number of repetitions to automate the recording of these payments.
Viewing and Management: To view and manage these recurring and future transactions:
- Access the calendar on the transactions page.
- Choose how you want to view future transactions: in the week, next month, or next year.
- Scheduled transactions are displayed in light shades of gray to differentiate them from past and present transactions.
Verifying Transactions
Checking your transactions against your bank account records is crucial to ensure the accuracy of your financial control. Now, let’s show how to verify your transactions, certifying your postings.
By default, transactions are recorded in Finances as “unverified”. To proceed with the verification of a transaction, select the lock icon located to the right of your account name on the home page. This will trigger a menu, as previously described. Then select the option “Unlock transaction verification”, which will change the icon to an open lock, indicating that the verification of transactions is unlocked.
To mark a transaction as verified, simply touch it. In the graphical interface, you will notice that the transaction loses its highlighted visualization. Once all your transactions have been verified, it is imperative to reactivate the verification lock to prevent accidental changes in their status.
It’s important to note that verified transactions cannot be edited or deleted. To make any changes, it will be necessary to mark it as “unverified”.
The Importance of Verifying Transactions
Transaction verification goes beyond merely confirming the accuracy of the movements documented in the app; it is essential for recognizing strange or unauthorized transactions in your bank accounts.
This feature significantly enhances the monitoring capability of transactions, reinforcing your command over financial inflows and outflows by highlighting recorded activities in your accounts that may have gone unnoticed by the app. Such vigilance is crucial for identifying undue or even unknown debits. Adopting this measure promotes a clear and up-to-date view of your financial health, ensuring the integrity of your financial control.
Importing Transactions via OFX Files
OFX (Open Financial Exchange) files are standard file formats essential for the electronic exchange of financial information between financial institutions, clients, and financial management software. They facilitate the automatic import of bank transaction data, becoming a valuable tool for efficiently managing your finances in Finances. Currently, Finances supports OFX files in version 1.0.2, easily identifiable in the file header when viewed with a simple text editor.
OFXHEADER:100
DATA:OFXSGML
VERSION:102
SECURITY:NONE
ENCODING:UTF-8
CHARSET:NONE
COMPRESSION:NONE
OLDFILEUID:NONE
NEWFILEUID:NONE
<OFX>
<SIGNONMSGSRSV1>
<SONRS>
<STATUS>
<CODE>0</CODE>
<SEVERITY>INFO</SEVERITY>
...
Some financial institutions adopt OFX files in versions 1.6, 2.0.1, 2.1.1, and 2.2. However, to date, we have not identified an OFX file suitable for integration into Finances. If your bank operates with these standards, consult the instructions below to submit a sample that enables implementation.
How to Import OFX Files into Finances
- Acquiring the Files: Initially, it is necessary to obtain the OFX files detailing the movements of your bank accounts for the desired period. Some institutions provide OFX statements monthly, along with account statements, while others may require the user to download these files directly through the bank’s app. Either way, these can be acquired through your financial institution’s internet banking service.
- Preparation for Import: Before importing the files into Finances, ensure they are stored in an easily accessible location on your device. It’s crucial to understand that Finances does not support the direct import of online bank statements; therefore, the OFX files must first be downloaded to your device or computer, and then transferred to the device via Google Drive, local network, or USB cable.
- Navigating to the OFX Function in Finances: In the Finances app, access the OFX functionality through the navigation bar located at the bottom of the screen, selecting the fourth icon. Use the “+” button to browse files on your device and locate the OFX files you wish to import.
- Selection and Import of Files: When an OFX file is selected, a summary with information pertinent to the file will be presented. Here, you have the option to adjust the bank name and link the file to a specific account within Finances. Finances will associate the “Bank Account” number to one of your registered accounts, simplifying future imports to the same account. At this point, just proceed.
- Adding the Transactions: With the settings duly adjusted, proceed with the inclusion of transactions in the system. Finances will display each transaction contained in the OFX file, allowing assignment to specific categories, in a manner similar to the procedure for manual addition of transactions. The original description of each transaction, kept unchanged, is used to automatically link future transactions to the same category and with the declared description, facilitating the categorization and organization of your finances.
Finances will create a list of transaction templates with predefined categories and descriptions to facilitate the import of new transactions via OFX.
Automatic Transactions
The use of “Automatic Transactions” is recommended for subsequent OFX file imports.
“Automatic Transactions” optimize the process, requiring attention only for new transactions not previously registered in Finances. To use “Automatic Transactions,” follow the best practices:
- Unknown Category: It is advised to create an “Unknown” category for unidentified expenses, which may become common in OFX imports from previous months.
- In the OFX file import, select the “Automatic Transactions” option and then select the “Stop at Categories…” button.
- In this dialog, select the “Unknown” category, or any other you wish to stop the automatic insertion. The “Transfers” category will be selected by default; it is advisable to keep it that way for now.
- Then continue with the inclusion of transactions. Finances will pause only for transactions not yet cataloged.
Skipping Transactions: Specific transactions can be skipped with the “Skip” button, without interrupting the entries of transactions. This can be useful to avoid duplicity in transfers between different accounts registered in different OFX files, such as in the postings of bank accounts and credit cards.
The integration of OFX files into Finances significantly enhances the entry of financial transactions into the app, providing a comprehensive and efficient approach to financial management.
Cancel Import: At any time, it is possible to cancel the import of transactions by pressing “Cancel.” This will remove all transactions related to that OFX file, as well as its record in the app, but the transaction templates created will be kept.
Removing OFX Entries
Information related to imported OFX files is organized and displayed conveniently on the OFX page of Finances, sorted by the opening date. If it becomes necessary to remove any of these files and their associated transactions, the process is straightforward and simple.
To delete the OFX entries, simply swipe the OFX file record to the left. This action will remove the file’s record from Finances, as well as all transactions linked to it.
Currently, imported OFX files are not editable within Finances. Support for these files is in continuous development, aiming for improvements and the implementation of new features in future versions. Adjustments are expected to be made to expand the flexibility and management options of imported OFX files, following the needs of users and app usage trends.
My OFX File Generates an Import Error
It is possible that OFX files provided by some financial institutions may be incompatible with the current version of Finances, especially if these OFX implementations do not follow strict standards. Although the OFX reader in Finances has a certain flexibility to handle poorly formed files, correcting some common errors related to tag closure, specific standards from certain banks may not be fully compatible.
If you encounter problems with importing an OFX file, consider sending the file for analysis to alvesdev67@gmail.com. Before sending, it is important to edit the file in a simple text editor to remove sensitive information, such as the bank account number located between the ACCTID tags. Change the content to ensure your privacy.
OFXHEADER:100
DATA:OFXSGML
VERSION:102                <!-- <====== Your OFX Version -->
SECURITY:NONE
ENCODING:UTF-8
CHARSET:NONE
COMPRESSION:NONE
OLDFILEUID:NONE
NEWFILEUID:NONE
<OFX>
<SIGNONMSGSRSV1>
...
<STMTTRNRS>
<TRNUID>1</TRNUID>
<STATUS>
<CODE>0</CODE>
<SEVERITY>INFO</SEVERITY>
</STATUS>
<STMTRS>
<CURDEF>BRL</CURDEF>
<BANKACCTFROM>
<BANKID>0260</BANKID>
<BRANCHID>1</BRANCHID>
<ACCTID>000000000-0</ACCTID>          <!-- <====== Change your account number -->
<ACCTTYPE>CHECKING</ACCTTYPE>
</BANKACCTFROM>
...
Additionally, you may opt to remove some transactions from the file to maintain greater privacy. Ensure to keep at least five transactions in the file, which will help in identifying the problem. The example below illustrates two transactions delimited by the <STMTTRN> and </STMTTRN> tags.
...
<STMTTRN>
    <TRNTYPE>DEBIT</TRNTYPE>
    <DTPOSTED>20230808000000[-3:BRT]</DTPOSTED>
    <TRNAMT>-2675.83</TRNAMT>
    <FITID>64d23f37-a2f7-4f47-b93f-530ce8cdd654</FITID>
    <MEMO>Invoice Payment</MEMO>
</

STMTTRN>
<STMTTRN>
    <TRNTYPE>DEBIT</TRNTYPE>
    <DTPOSTED>20230812000000[-3:BRT]</DTPOSTED>
    <TRNAMT>-4.41</TRNAMT>
    <FITID>64d7dd31-19ba-48f5-8d00-e012eb6907c6</FITID>
    <MEMO>Debit Purchase - Emporio Praia de Itapa</MEMO>
</STMTTRN>
...
These precautions ensure that your personal information is protected while allowing us to analyze the problem to improve the compatibility and functionality of Finances with OFX files from different financial institutions.
Accessing and Adjusting Settings
Finances offers various customization options, information, and tools, allowing you to tailor the app to your personal preferences and financial management needs. Let’s explore how to access these settings and what each one offers.
Options Menu
- Access: Tap the three dots located in the upper right corner of the main app screen to open the options menu.
- Available Options:
- Settings: Adjust the app’s preferences.
- Backup and Restore: Manage the backup of your financial data and restore it when necessary.
- About Page: with information about the app, developer, and more.
- Exit App: Terminate the current session in the app.
Customizing Your Settings
Within Finances’ settings, you’ll find options to:
- User Name: Update or edit the user name to reflect how you want to be identified within the app.
- App Theme: Choose between light, dark, or system themes for comfortable viewing according to your preferences or ambient light conditions.
- Language Selection: Adapt the app’s language to your linguistic preference, making navigation and understanding of features more intuitive.
- Transactions per Page: Configure the number of transactions displayed per page. Adjusting this number to match the average transactions you record per month can optimize the autocomplete functionality, both for descriptions and for selecting categories in new entries.
Important Considerations
- Implementation of Changes: Some changes in settings may require you to restart the app for the changes to take effect. This ensures that Finances operates efficiently with the new settings.
- Backup and Restoration: Taking advantage of the backup and restore functionality is crucial to protect your financial data. Maintaining regular backups can safeguard your information against accidental losses and facilitate the transfer of data between devices.
These configuration options not only provide a more personalized and enjoyable experience while using Finances but also reinforce the security and integrity of your financial data. By adapting the app to your preferences and habits, you can maximize the utility and effectiveness of your personal financial management.
Managing Backup and Restoration
The security of your financial data is essential for effective personal finance management. Finances offer robust backup and restoration functionalities, allowing you to protect your information against accidental losses or issues with your device. Here’s how simple it is to create backups of your data and restore them when necessary.
Creating a Backup
- Access: In the main app menu, locate and select the Backup option.
- Creation: Click the button to create a new backup. You will be prompted to choose a location on your device to save the backup file. Choose a secure and easily accessible directory for future restorations.
- Confirmation: After selecting the location and confirming the creation, the backup will be performed, and a success message will be displayed, indicating that your data has been securely saved.
Restoring a Backup
- Access: Return to the Backup option in the main menu when you need to restore your data from an existing backup.
- Restoration: Press the button to restore a backup. Navigate to the directory on your device where the backup file is stored and select it.
- App Restart: With the backup file selected, the restoration process will begin, and the app will automatically restart once the restoration is completed. Your data will be restored to the state saved in the backup, ensuring you do not lose your financial information.
Importance of Backup and Restoration
- Precaution: Given the importance of the data maintained in Finances, conducting regular backups is a recommended practice to ensure the security and integrity of your financial information.
- Secure Storage: Consider storing backup copies in secure locations, in addition to your device, such as in cloud storage services or external storage devices, for an extra layer of security.
We appreciate your trust in Finances as your financial control tool. We are always available to assist in your financial journey, whether to clarify doubts or to receive suggestions that can further improve your experience with the app. Remember, keeping your data secure is a crucial step towards effective personal finance management.
Final Considerations
The Finances documentation provided offers a complete and detailed guide for new users and for those wishing to delve further into the app’s functionalities. From accessing and navigating through the user manual to creating and managing accounts, categories, and transactions, this guide covers all the necessary aspects for effective personal financial control. Additionally, we discussed the importance and the process of OFX file importation, a feature that significantly increases the ease and speed of adding transactions to Finances.
The sections on settings and backup and restoration management underscore Finances’ flexibility in adapting to user preferences while ensuring data security and integrity. This guide aims not only to familiarize users with the app’s basic operations but also to highlight advanced features that can enhance financial management.
In conclusion, Finances is a robust tool designed to simplify and effectively facilitate the management of your finances. The team behind Finances continues to be dedicated to improving and expanding its functionalities, always with the goal of meeting user needs and exceeding expectations. We encourage everyone to take advantage of the app’s rich features, share feedback, and contribute to an ever-improving user experience. Whether for daily transaction recording, long-term financial organization, or quick data recovery via backups, Finances aims to be your reliable partner on the path to greater financial health.
Leave a Reply